![]()
Once you have finished authoring your project, you can start to generate your video disc.
Video Options
![]()
Before you start anything, you need to ensure that you've selected the right Video Options. There are 2 main video standards used in the world: PAL and NTSC. NTSC is used in US and Japan, while Europe and most parts of the world use PAL. This setting will not matter if your DVD player is multi-system compatible.
You will also need to select the type of disc you want to create. The following table shows the features of each of these formats:
|
Format |
Video Quality |
DVD Player Compatibility |
Requires |
|
VCD |
Average |
Good |
CD writer + CD-R/CD-RW |
|
SVCD |
Very Good |
Average |
CD writer + CD-R/CD-RW |
|
DVD |
Excellent |
Excellent |
DVD writer + DVD-R(W)/DVD+R(W) |
Note that to create a SVCD or DVD, the external MPEG2 plugin is required. Check out the MemoriesOnTV website for more information. When you do not have the MPEG2 plugin installed, you will see the SVCD and DVD options in gray color. If you have installed the MPEG2 plugin evaluation copy, you will see them in red color. Otherwise, it will be in black color.
In evaluation mode, any produced CD/DVD will bear the EVALUATION COPY watermark on the created video.
Burn Options
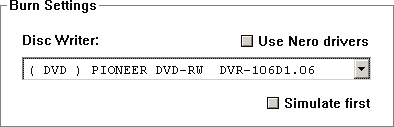
The Burn Settings will show you a list of burners detected on your PC. If your burner is not listed, or it is unsupported, you can hook up MemoriesOnTV with Nero to do the burning behind the scene. This is detailed in the CD/DVD Burning Troubleshooting Guide.
If you wish, you can simulate the burning first before the actual burn, by selecting Simulate first. This is usually unnecessary, however.
Video Size Indicator
Before you proceed to burn your CD or DVD, you should check that the size of your project does not exceed the disc capacity. At the bottom of the MemoriesOnTV window is a blue color size indicator. If you are burning a CD recordable, the limit is usually 650Mb or 700Mb. If you are burning a DVD recordable, the limit is 4.7Gb.
On the right of the size indicator is a combo-box for choosing whether you want to store your original files on the same CD or DVD. You have the option not to store anything, store just the original photos, or store all your original photos & videos on the same CD or DVD. Do note that storing the original files on the same CD/DVD will increase the size of your project, and you should check that it is still within the capacity of your empty disc. If you store the original files, you will have an archive that you can use later for hard copy printout of your photos.
Video Disc Creation
There are 2 main steps needed to create your video disc:
Video Generation - For each second of video, about 25-30 pictures have to be generated from your files, and then compressed highly using MPEG. This process will take quite a while to complete, especially on a slower PC.
CD/DVD Burning - After the video files are generated, they are burnt onto your empty discs using the built-in burning software.
MemoriesOnTV allows you to perform the above steps separately, or as one single step. You have the following 3 choices:
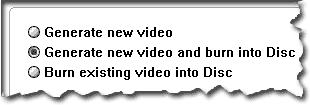
Generate new video performs only video generation, while Generate new video and burn into Disc performs both video generation and CD/DVD burning. Burn existing video performs CD/DVD burning on a previously generated video.
All generated video files are written into the folder you have specified. In the case of a (S)VCD, this will be in the form of a BIN/CUE format disc image named videocd.cue & videocd.bin. In the case of DVD, this will be in the form of standard DVD video folders named VIDEO_TS and AUDIO_TS. Many DVD related software supports reading of the VIDEO_TS folder, for either DVD burning or video playback.
Once you are ready, click on START to kick off the process. As mentioned, video generation is a time consuming process. To speed things up, you should avoid running too many background tasks when video generation is in progress.